
ഈ ഒരു സൂത്രം ചെയ്താൽ മാത്രം മതി! പേര കുറ്റി ചെടിയായി ചുവട്ടിൽ നിന്നും കുലകുത്തി കായ്ക്കും; പേരക്ക പൊട്ടിച്ചു മടുക്കും!! | Easy Guava Air Layering Tips
Easy Guava Air Layering Tips
Easy Guava Air Layering Tips : പേര കുറ്റി ചെടിയായി ചുവട്ടിൽ നിന്നും കായ്ക്കാൻ ഇതാ ഒരു സൂത്രപ്പണി! ഇനി കിലോ കണക്കിന് പേരക്ക പൊട്ടിച്ചു മടുക്കും; പേരക്ക ചട്ടിയിൽ നിറയെ കുലകുത്തി കായ്ക്കാൻ കിടിലൻ സൂത്രം വളരെയധികം ഔഷധഗുണമുള്ളതും നിറയെ വിറ്റാമിനുകൾ അടങ്ങിയതുമായ ഒരു ഫലവർഗമാണ് പേരയ്ക്ക എന്ന് പറയുന്നത്. അതുകൊണ്ട് തന്നെ നാട്ടിൻ പുറങ്ങളിലും മറ്റും എപ്പോഴും കണ്ടുവരുന്ന ഒന്നാണ് പേരയ്ക്ക.
എന്നാൽ ഇതിന്റെ അളവ് ഗണ്യമായ രീതിയിൽ കുറഞ്ഞിരിക്കുകയാണ് ഇന്ന്. തമിഴ്നാട്ടിൽ നിന്നും മറ്റും ഇറക്കുമതി ചെയ്ത പേരയ്ക്ക വിപണിയിൽ സുലഭമായി ലഭിക്കുന്നുണ്ടെങ്കിൽ തന്നെയും നാടൻ പേരക്കയുടെ രുചിയോ ഗുണമോ ഒന്നും തന്നെ ഇതിന് ഉണ്ടാകില്ല എന്നതാണ് വസ്തുത. അതുകൊണ്ട് എങ്ങനെ വീട്ടിൽ പേര കൃഷി ചെയ്യാം എന്നാണ് ഇന്ന് നോക്കാൻ പോകുന്നത്. അധിക പരിപാലനമോ വള പ്രയോഗങ്ങളൊന്നും
ആവശ്യമില്ലാത്ത ഒരു ഫലവർഗം കൂടിയാണ് പേര. ആർക്ക് വേണമെങ്കിലും വീടിൻറെ ഓരം ചേർന്ന് നട്ടെടുക്കാവുന്ന ഈ ചെടി എങ്ങനെ ബഡ് ചെയ്ത് എടുക്കാം എന്നാണ് ഇന്ന് നോക്കുന്നത്. വിപണിയിൽ നിന്ന് കിട്ടുന്ന തൈകൾ പലപ്പോഴും ബഡ് ചെയ്തത് ആയിരിക്കും. എന്നാൽ ഗുണം അധികം ഉണ്ടോ എന്ന് ചോദിച്ചാൽ പൂർണമായി ഉണ്ടെന്ന് പറയുവാൻ സാധിക്കുകയുമില്ല. അതു കൊണ്ട് വീട്ടിൽ എങ്ങനെ പേര ബഡ് ചെയ്ത് എടുക്കാം
എന്നാണ് നോക്കാൻ പോകുന്നത്. അതിനായി ആദ്യം ചെയ്യേണ്ടത് ബഡ് ചെയ്യാൻ എടുക്കുന്ന പേരയുടെ കമ്പ് അധികം മൂത്തതോ അധികം തളിർത്തതോ ആകാൻ പാടില്ല എന്നതാണ്. ഇടത്തരം വലിപ്പമുള്ള കമ്പ് ആണ് ഇതിനായി ഉപയോഗിക്കുവാൻ അനുയോജ്യം. ഇതിനെ കുറിച്ചുള്ള കൂടുതൽ വിവരങ്ങൾ വിഡിയോയിൽ വിശദമായി പറഞ്ഞു തരുന്നുണ്ട്. വീഡിയോ മുഴുവനായും കണ്ടു നോക്കി നിങ്ങളും ഇതുപോലെ ചെയ്തു നോക്കൂ. നിങ്ങൾക്കും നല്ല റിസൾട്ട് കിട്ടും. Easy Guava Air Layering Tips Video credit : Fayhas Kitchen and Vlogs
Easy Guava Air Layering Tips – Grow Your Own Guava Tree at Home!
Want to grow more guava trees from an existing plant? Try air layering – a natural, soil-free propagation method that gives you a clone of the parent plant with better yield and disease resistance. It’s perfect for beginners and requires no special tools!
Time Required:
- Preparation Time: 20 minutes
- Root Formation Time: 30–45 days
- Best Season: Rainy season (June–August) or early monsoon
What You Need:
- A healthy guava branch (pencil-thick, semi-woody)
- Sharp knife or blade
- Rooting hormone (optional but helpful)
- Moist cocopeat or sphagnum moss
- Cling wrap or polythene sheet
- Twine or zip ties
- Aluminum foil (optional – for protection from sun)
Steps for Air Layering Guava Plant:
1. Choose the Right Branch
- Select a healthy, 1-year-old semi-hardwood branch about 1 cm thick
- Avoid branches that are too tender or too old
best branch for guava air layering
2. Remove the Bark (Ring Cut Method)
- Make two cuts 1 inch apart around the branch
- Remove the bark between the cuts to expose the inner white wood
- Scrape slightly to remove the green cambium layer
3. Apply Rooting Hormone (Optional)
- Use natural rooting powder (like cinnamon or aloe vera gel)
- Commercial rooting hormones can speed up root development
how to apply rooting hormone for guava layering
4. Wrap with Moist Medium
- Soak cocopeat or sphagnum moss and squeeze out excess water
- Wrap it around the cut area (like a small ball)
- Cover with plastic wrap and secure both ends tightly with twine or zip ties
- Optionally, cover with aluminum foil to protect from sunlight
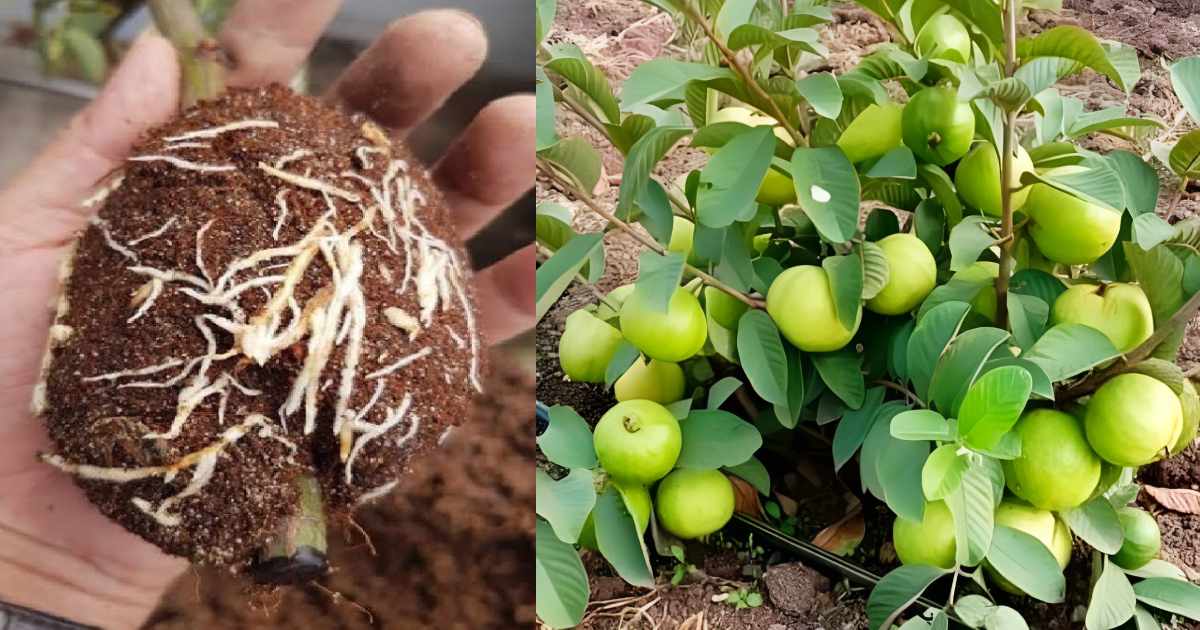
5. Wait for Root Growth
- Check in 30–45 days
- If you see white roots through the plastic, it’s ready to cut and plant
how long guava air layering takes
6. Cut and Plant the Layered Branch
- Use clean scissors to cut just below the rooted portion
- Plant in a pot with well-drained soil + compost
- Keep in partial shade for 1 week before exposing to full sunlight
Bonus Tips:
- Water the mother plant regularly during the rooting period
- Avoid disturbing the wrap once sealed
- Best done during humid seasons for faster rooting
Easy Guava Air Layering Tips
- Guava air layering method
- How to propagate guava plant
- Rooting guava branch at home
- Guava tree from air layering
- Best way to multiply guava plants